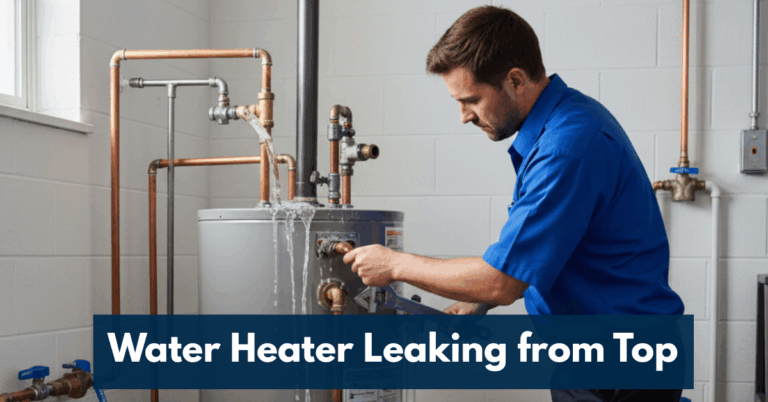
A water heater leaking from the top can be frustrating — and potentially damaging if not fixed quickly. Even small drips can lead to corrosion, water damage, and increased energy costs. If you’ve noticed moisture, puddles, or a steady drip from the top of your tank, it’s time to act before the problem worsens.
In this detailed guide, we’ll explore the common causes behind a water heater leaking from top, effective ways to stop the leak, and when to call in professionals. Plus, we’ll show you why Whitney Services is your trusted partner for reliable water heater repairs, maintenance, and replacement.
Understanding Why Your Water Heater Is Leaking from the Top
Before jumping into repairs, it’s important to understand where and why the leak is happening. A water heater leaking from the top usually points to a problem with one of the following components:
1. Cold Water Inlet and Hot Water Outlet Connections
At the top of your water heater, there are two pipes — one bringing in cold water (inlet) and one sending out hot water (outlet).
Over time, these connections can loosen or corrode, leading to drips around the fittings. Sometimes, the flexible copper pipes or the dielectric nipples (fittings connecting metal pipes to the tank) can also wear out and begin to leak.
Fix:
Tighten the fittings using a wrench — but carefully, as over-tightening can cause more damage. If the leak persists, you may need to replace the fittings or apply Teflon tape to ensure a watertight seal.
2. Temperature and Pressure (T&P) Relief Valve Leak
The T&P valve is a critical safety device that releases pressure if your tank gets too hot.
If water is dripping from the top near the T&P valve, it could be due to excess pressure, sediment buildup, or a faulty valve.
Fix:
Turn off power and water to the heater, then inspect the valve for cracks or mineral buildup. If it’s defective, replace it immediately. Persistent leaks even after replacing the valve may indicate excessive tank pressure — a sign you need professional service from Whitney Services.
3. Loose or Damaged Anode Rod Port
Your water heater has an anode rod that protects the tank from rusting. It’s usually accessed from the top of the unit.
If it becomes loose or corroded, water can escape through the port.
Fix:
Tighten the anode rod cap with a socket wrench. If the rod is badly corroded, it’s best to replace it — something the experts at Whitney Services can handle safely and efficiently.
4. Leaking from the Vent or Flue Pipe (Gas Water Heaters)
For gas-powered units, the vent or flue pipe releases combustion gases.
Condensation or poor vent installation can cause water to drip from around the flue area.
Fix:
Ensure the vent pipe is properly sealed and sloped upward to allow gases to escape efficiently. If you notice continuous moisture, have a technician inspect for backdrafting issues.
5. Condensation or Environmental Moisture
Occasionally, what appears to be a leak may actually be condensation.
If your basement or utility room is humid, moisture can form on the cooler surface of the tank and drip down.
Fix:
Wipe the tank dry and monitor it for new water formation. If the dripping continues or water pools under the heater, it’s a genuine leak and needs repair.
Step-by-Step Guide: How to Stop Water Drips from the Top
If you’ve identified that your water heater is leaking from the top, follow these steps to stop the leak safely:
Step 1: Turn Off Power or Gas Supply
- Turn off the circuit breaker for electric water heaters.
- For gas water heaters: Turn the gas control knob to the “Pilot” position or completely off.
This prevents accidents while you inspect or repair.
Step 2: Shut Off the Cold Water Supply
Locate the cold water shut-off valve (usually above the heater).
Turn it clockwise to stop water flow into the tank. This prevents additional leakage while you troubleshoot the issue.
Step 3: Identify the Leak Source
Use a dry towel or tissue to carefully trace where the water is coming from — check fittings, pipes, and valves. This helps narrow down whether it’s a simple fix or a deeper problem requiring expert help.
Step 4: Tighten Loose Fittings or Replace Faulty Components
If you find a loose connection, gently tighten it. For damaged parts such as a T&P valve or anode rod, replacement may be necessary. Always use quality components designed for your heater’s brand and model.
Step 5: Restore Power and Check for Drips
After making repairs, turn the water and power back on. Observe the area for at least 15–30 minutes to ensure no further dripping occurs.
If the water heater leaking from top issue persists, it’s best to call Whitney Services for professional diagnosis and repair.
When to Call a Professional Plumber
While minor leaks can be fixed with simple tightening or part replacement, some situations require expert attention:
- The leak continues after you tighten fittings.
- Corrosion is visible on top of the tank or around the valves.
- The T&P valve keeps discharging water.
- You smell gas (for gas heaters) or see rust-colored water.
- The heater is over 10 years old and frequently leaking.
If any of these apply, contact Whitney Services — the trusted name for water heater repair, replacement, and maintenance. Their skilled technicians can pinpoint the exact cause, stop leaks effectively, and ensure your system runs efficiently for years to come.
Preventing Future Leaks from the Top of Your Water Heater
Preventive maintenance is the best way to avoid leaks and extend your heater’s lifespan. Here’s what you can do:
1. Schedule Regular Inspections
Have your water heater checked annually by professionals like Whitney Services. They’ll examine all fittings, valves, and pipes for signs of wear and corrosion.
2. Replace the Anode Rod Every 3–5 Years
This simple step can prevent internal corrosion and prolong the tank’s life.
3. Flush the Tank Annually
Sediment buildup increases pressure inside the tank, which can lead to leaks. Flushing helps maintain efficiency and prevents damage.
4. Maintain Proper Water Pressure
High water pressure can stress the tank and valves. Keep it between 40–60 psi for optimal performance.
5. Check for Signs of Moisture Regularly
A quick monthly check at the top of the heater can catch small leaks before they turn into costly repairs.
Why Choose Whitney Services for Water Heater Repair?
When dealing with a water heater leaking from top, fast and professional service matters. Whitney Services is a trusted provider offering reliable plumbing and water heater repair solutions in Michigan and Florida.
Here’s why homeowners trust Whitney Services:
- Expert Technicians: Certified professionals with experience in all types of water heaters.
- Prompt Response: Emergency service available for urgent leaks and breakdowns.
- Affordable Repairs: Competitive pricing with transparent quotes.
- Complete Solutions: From small leak fixes to full heater replacements.
- Customer Satisfaction: Hundreds of homeowners rely on Whitney Services for consistent quality and care.
When your water heater leaks from the top, Whitney Services is the name you can depend on for lasting solutions and peace of mind.
Final Thoughts
A water heater leaking from the top may seem like a small issue, but ignoring it can lead to costly damage. By inspecting common leak points like the T&P valve, inlet and outlet fittings, and anode rod, you can often stop the drip early.
However, for persistent or complex leaks, it’s always best to rely on professionals. Whitney Services provides expert water heater inspection, repair, and installation services — ensuring your system runs efficiently and safely all year round.
Frequently Asked Questions
It usually happens due to loose fittings, a faulty T&P valve, corrosion around the anode rod, or condensation. Identifying the source helps determine the right fix.
It’s not recommended. Leaks can worsen over time and lead to electrical hazards or water damage. Turn off the power and water supply until it’s inspected.
Minor repairs (like tightening connections) may cost under $100, while replacing valves or fittings can range from $150–$300. Major corrosion or tank leaks may require replacement, costing $800–$1,500.
If your heater is under 8 years old and the leak is minor, repair is usually sufficient. However, if it’s older, rusted, or leaking frequently, replacement may be more cost-effective.
Regular maintenance, flushing the tank, checking valves, and inspecting the anode rod annually are the best prevention steps.